
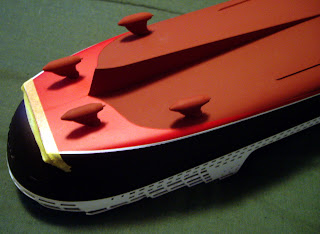
Here is a view of the bow thrusters and cover installed. Unfortunately you can't see the bow thrusters because they do look great when you look inside. My girlfriend Jayme painted them and is pretty disappointed that you have to look pretty hard to see them. When It came to installing the bow thrusters I did it after I put the hull together. The directions say to do it when you put the hulls together but personally I found it much easier afterwards. I also found putting in covers afterwards a lot easier too. I used Zap it glue to put the cover on so I didn't ruin the paint job on the hull. The glue stains will disappear when I dull coat it. I've had to do a little touching up so you'll have to excuse the tape in the photos. I attached the Azi Pods a
nd cemented them all in an
d won't attach the propellers until last. I do that so I don't break them in the process of building the model and it's a bit of a superstition for me as well. Revell gives you decals for the red on the bottom of the hull and waterline but I highly recommend painting it yourself. Again you want it as real as possible so try to avoid decals where you can. I attached the stabilizers and still noticed a little light through the opening. I used bondo and filled in behind and around because you don't want to see through the ship and you want to give the impression of it being the real thing. I attached the inner cabins to the inside of the hull. I primed the pieces, painted them white and glued them in place. As you can see in the picture the back of the ca

bin is painted black. I glued clear styrene plastic to the back and painted them black. By doing thi
s it gives the illusion of windows when you look through the spaces in the hull and you won't be able to see inside the ship. I actually used more clothes pins than what you see in the picture to make sure it was secured all the way along. Next on the list was to get the two stern decks ready for painting and securing. The bottom deck was painted grey and the walls white. You won't see it when you install it in the stern but I like to know I did it. Next was to paint the stern deck and the pool area. In order to do this I removed the grain by sand it dow

n flat. I did this because the actual stern deck of the Queen Mary II doesn't appear to be wood, but painted steel. There are also ledges around the stairwell and pool that are not there in real life. I removed them as well by sanding them down and what a difference it makes just in scale alone. The picture of the stern deck you see is only the beginning. I still have touching up and detail to add. There are also a couple decals and photo-etch parts that have to be applied but I'll get into that later.

 Here is a view of the bow thrusters and cover installed. Unfortunately you can't see the bow thrusters because they do look great when you look inside. My girlfriend Jayme painted them and is pretty disappointed that you have to look pretty hard to see them. When It came to installing the bow thrusters I did it after I put the hull together. The directions say to do it when you put the hulls together but personally I found it much easier afterwards. I also found putting in covers afterwards a lot easier too. I used Zap it glue to put the cover on so I didn't ruin the paint job on the hull. The glue stains will disappear when I dull coat it. I've had to do a little touching up so you'll have to excuse the tape in the photos. I attached the Azi Pods and cemented them all in an
 d won't attach the propellers until last. I do that so I don't break them in the process of building the model and it's a bit of a superstition for me as well. Revell gives you decals for the red on the bottom of the hull and waterline but I highly recommend painting it yourself. Again you want it as real as possible so try to avoid decals where you can. I attached the stabilizers and still noticed a little light through the opening. I used bondo and filled in behind and around because you don't want to see through the ship and you want to give the impression of it being the real thing. I attached the inner cabins to the inside of the hull. I primed the pieces, painted them white and glued them in place. As you can see in the picture the back of the ca
 bin is painted black. I glued clear styrene plastic to the back and painted them black. By doing this it gives the illusion of windows when you look through the spaces in the hull and you won't be able to see inside the ship. I actually used more clothes pins than what you see in the picture to make sure it was secured all the way along. Next on the list was to get the two stern decks ready for painting and securing. The bottom deck was painted grey and the walls white. You won't see it when you install it in the stern but I like to know I did it. Next was to paint the stern deck and the pool area. In order to do this I removed the grain by sand it dow
 n flat. I did this because the actual stern deck of the Queen Mary II doesn't appear to be wood, but painted steel. There are also ledges around the stairwell and pool that are not there in real life. I removed them as well by sanding them down and what a difference it makes just in scale alone. The picture of the stern deck you see is only the beginning. I still have touching up and detail to add. There are also a couple decals and photo-etch parts that have to be applied but I'll get into that later.

 Here is the start of my Revell Queen Mary II. I haven't added anything yet such as the bow thrusters, stabilizers and Azi Pods yet. After I put the two halves together I made sure I sanded and filled any imperfections. After that was done I primed the entire hull with Tamiya Surface Primer. By using the grey prim


